Automated separate hydroponics and mushroom fruiting chamber

Hi! I recently found your project and it looks fantastic! I’m working on setting up a mushroom fruiting chamber and also a small scale NFT hydroponics system (108 ish plants). I’m thinking both systems will be housed in the same heated room and the fruiting chamber will be a DIY airtight rack for housing the buckets.

I’m not sure what would be the best solution here, if this should be two entirely separate systems or if t here’s a better way to combine the two, e.g running Mycodo on my already setup server w/docker and use ESP32’s(?) for the two different systems? I’m very much still in a research stage, so sorry if this makes no sense. I’d really prefer to drop the Raspberry Pi usage, because they retail for $130 (when they can be found in stock) in my country.

I’m also a huge Aliexpress fan, due to the insanely high shipping and import fees from Amazon, if that impacts hardware/material choices.

For the fruiting chamber I would like to monitor/control the air temp/humidity/CO2, soil moisture, light and FAE. Anything else?

For the hydroponics system I’d like to do all the things as per Kyle Gabriel’s list.

I’d like to keep it as low cost as possible without sacrificing too much accuracy.

Any tips or guidance would be most welcome!

Oh boy, here we go again.
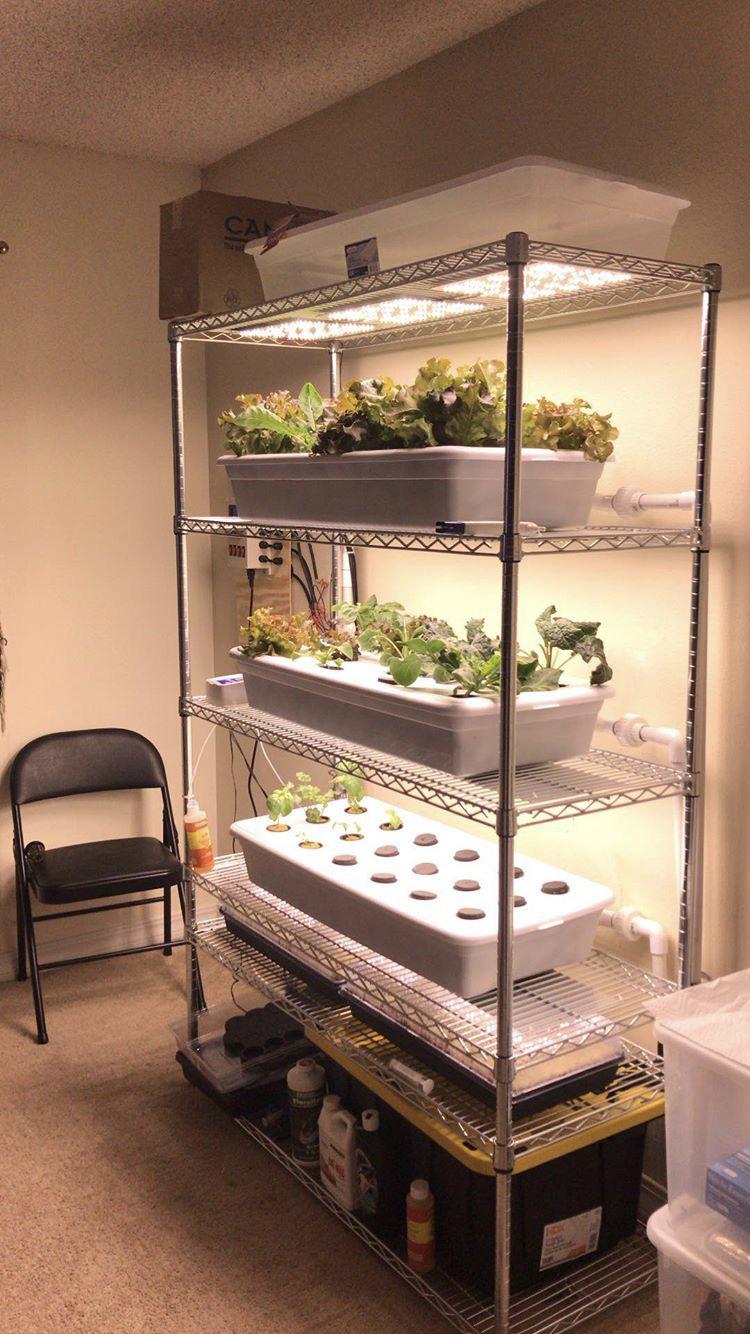
@ Kyle Gabriel - Please, please, please put some kind of disclaimer on the site and video so that people understand that the system in your video is a proof-of-concept demonstration and not the end-all-be-all of hydroponics systems. There are far better, less complicated, and MUCH less expensive types of systems, and often they don’t even need any complicated automation or computer control to work just fine. I ran my systems for years with nothing more than a couple of cheap timers for lights and watering pumps and grew lots of veggies and salad greens with no problems.
Hydroponics does NOT need to be complicated.
Hydroponics does NOT need to be expensive.
Especially for first time beginners. :slight_smile:

@ infectiousstupidity - Before you decide on a type of hydroponics system to build, first figure out what kinds of plants you want to grow.
There are many types of hydroponics systems.
You should choose one based on what crops you want to grow, and how much you need to grow.
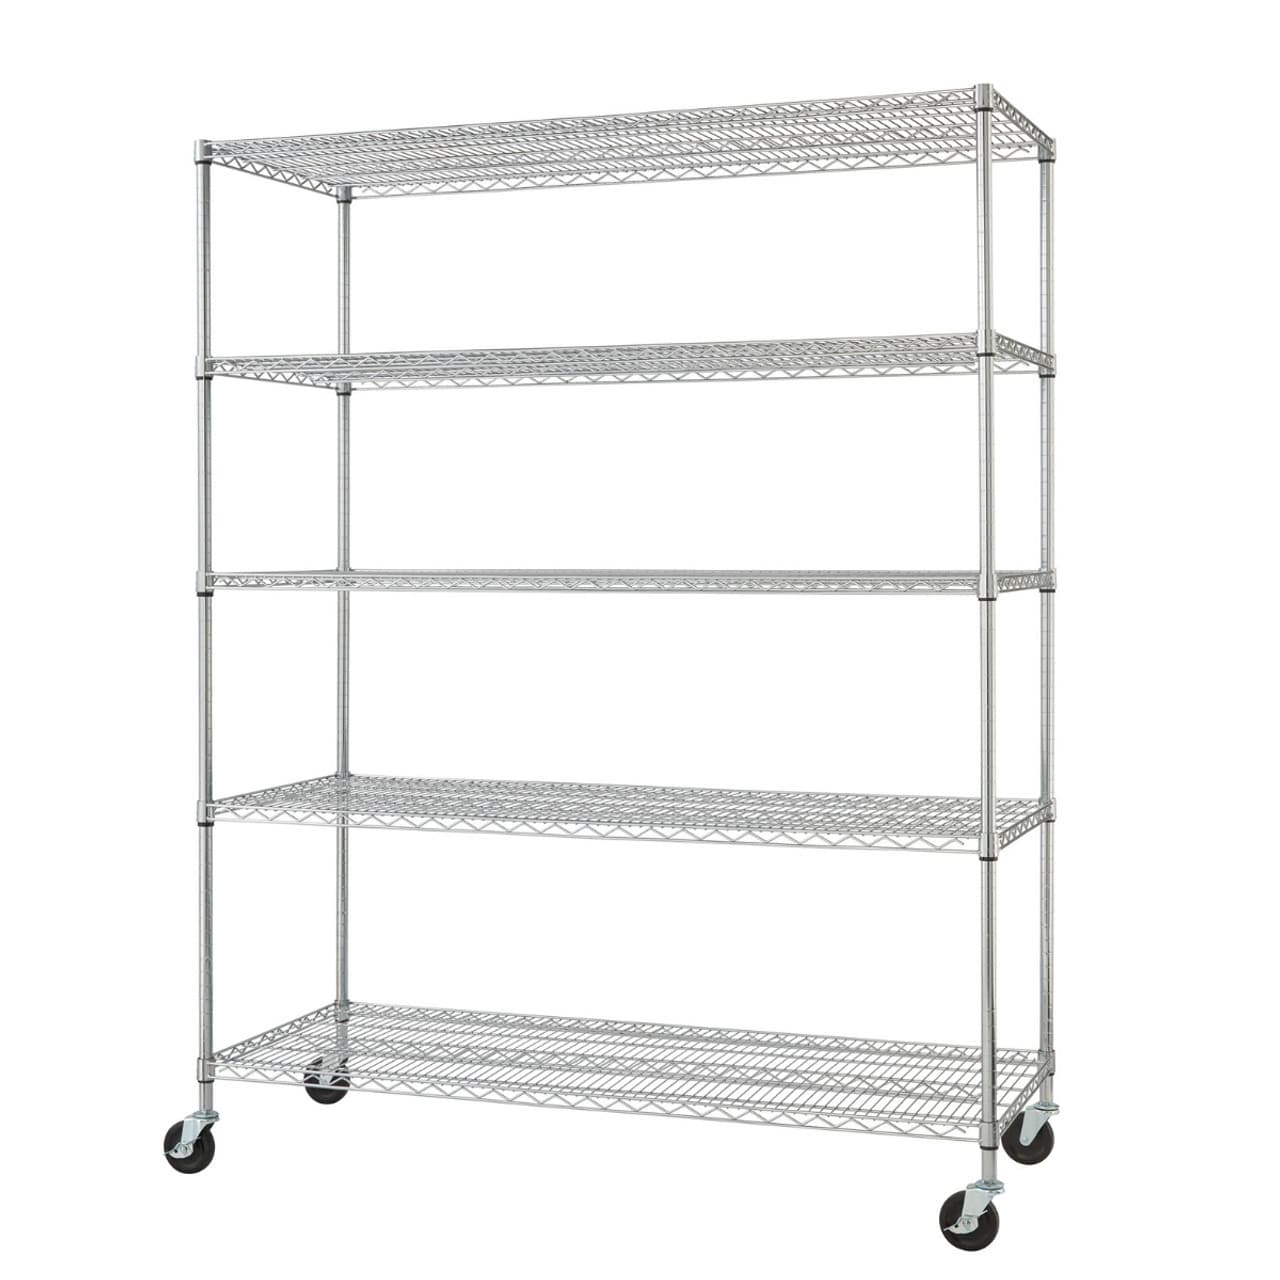
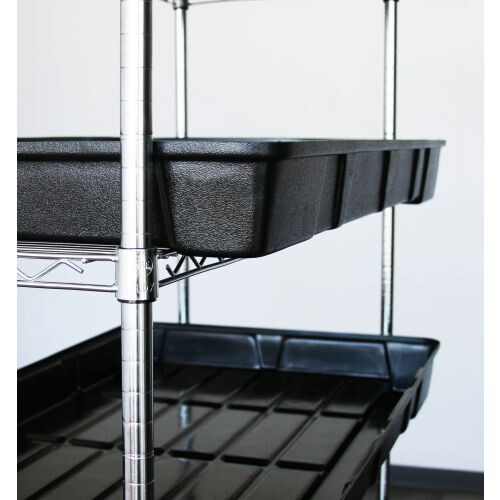
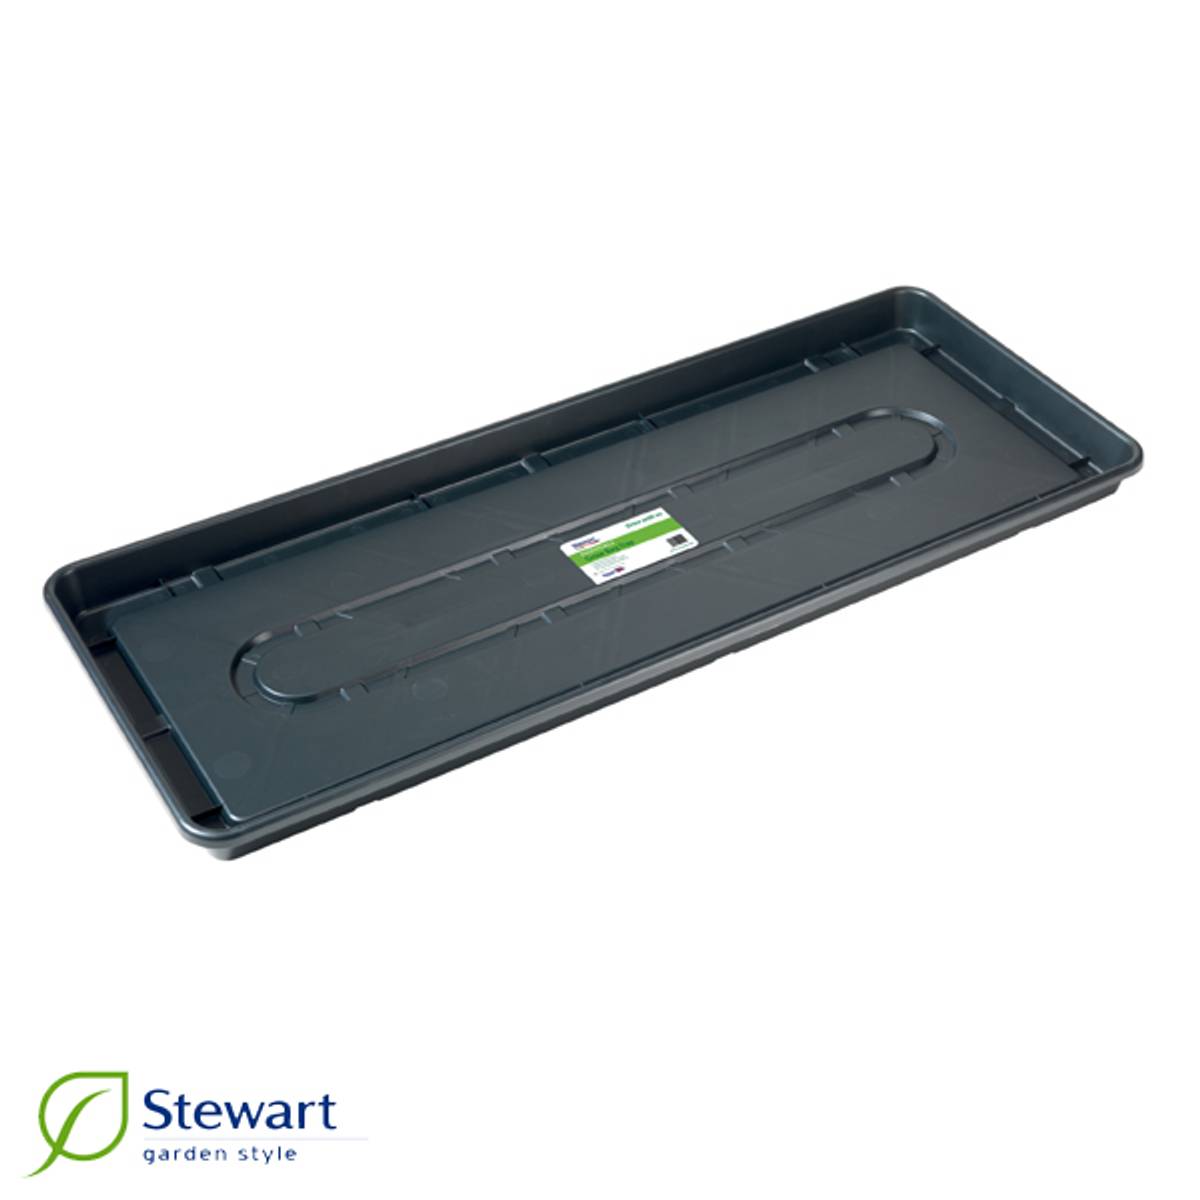
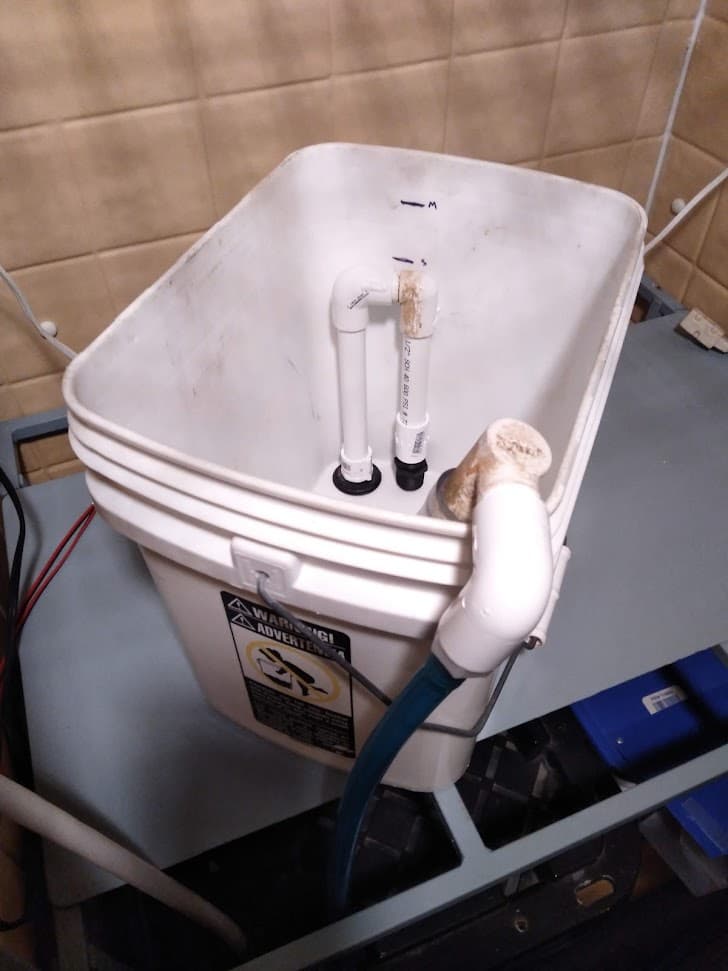
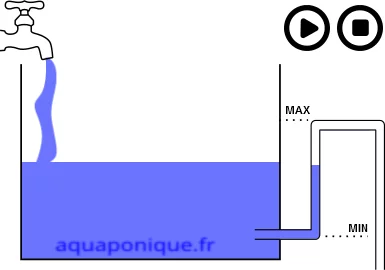
In my experience, the trough-style NFT system is not the best choice.
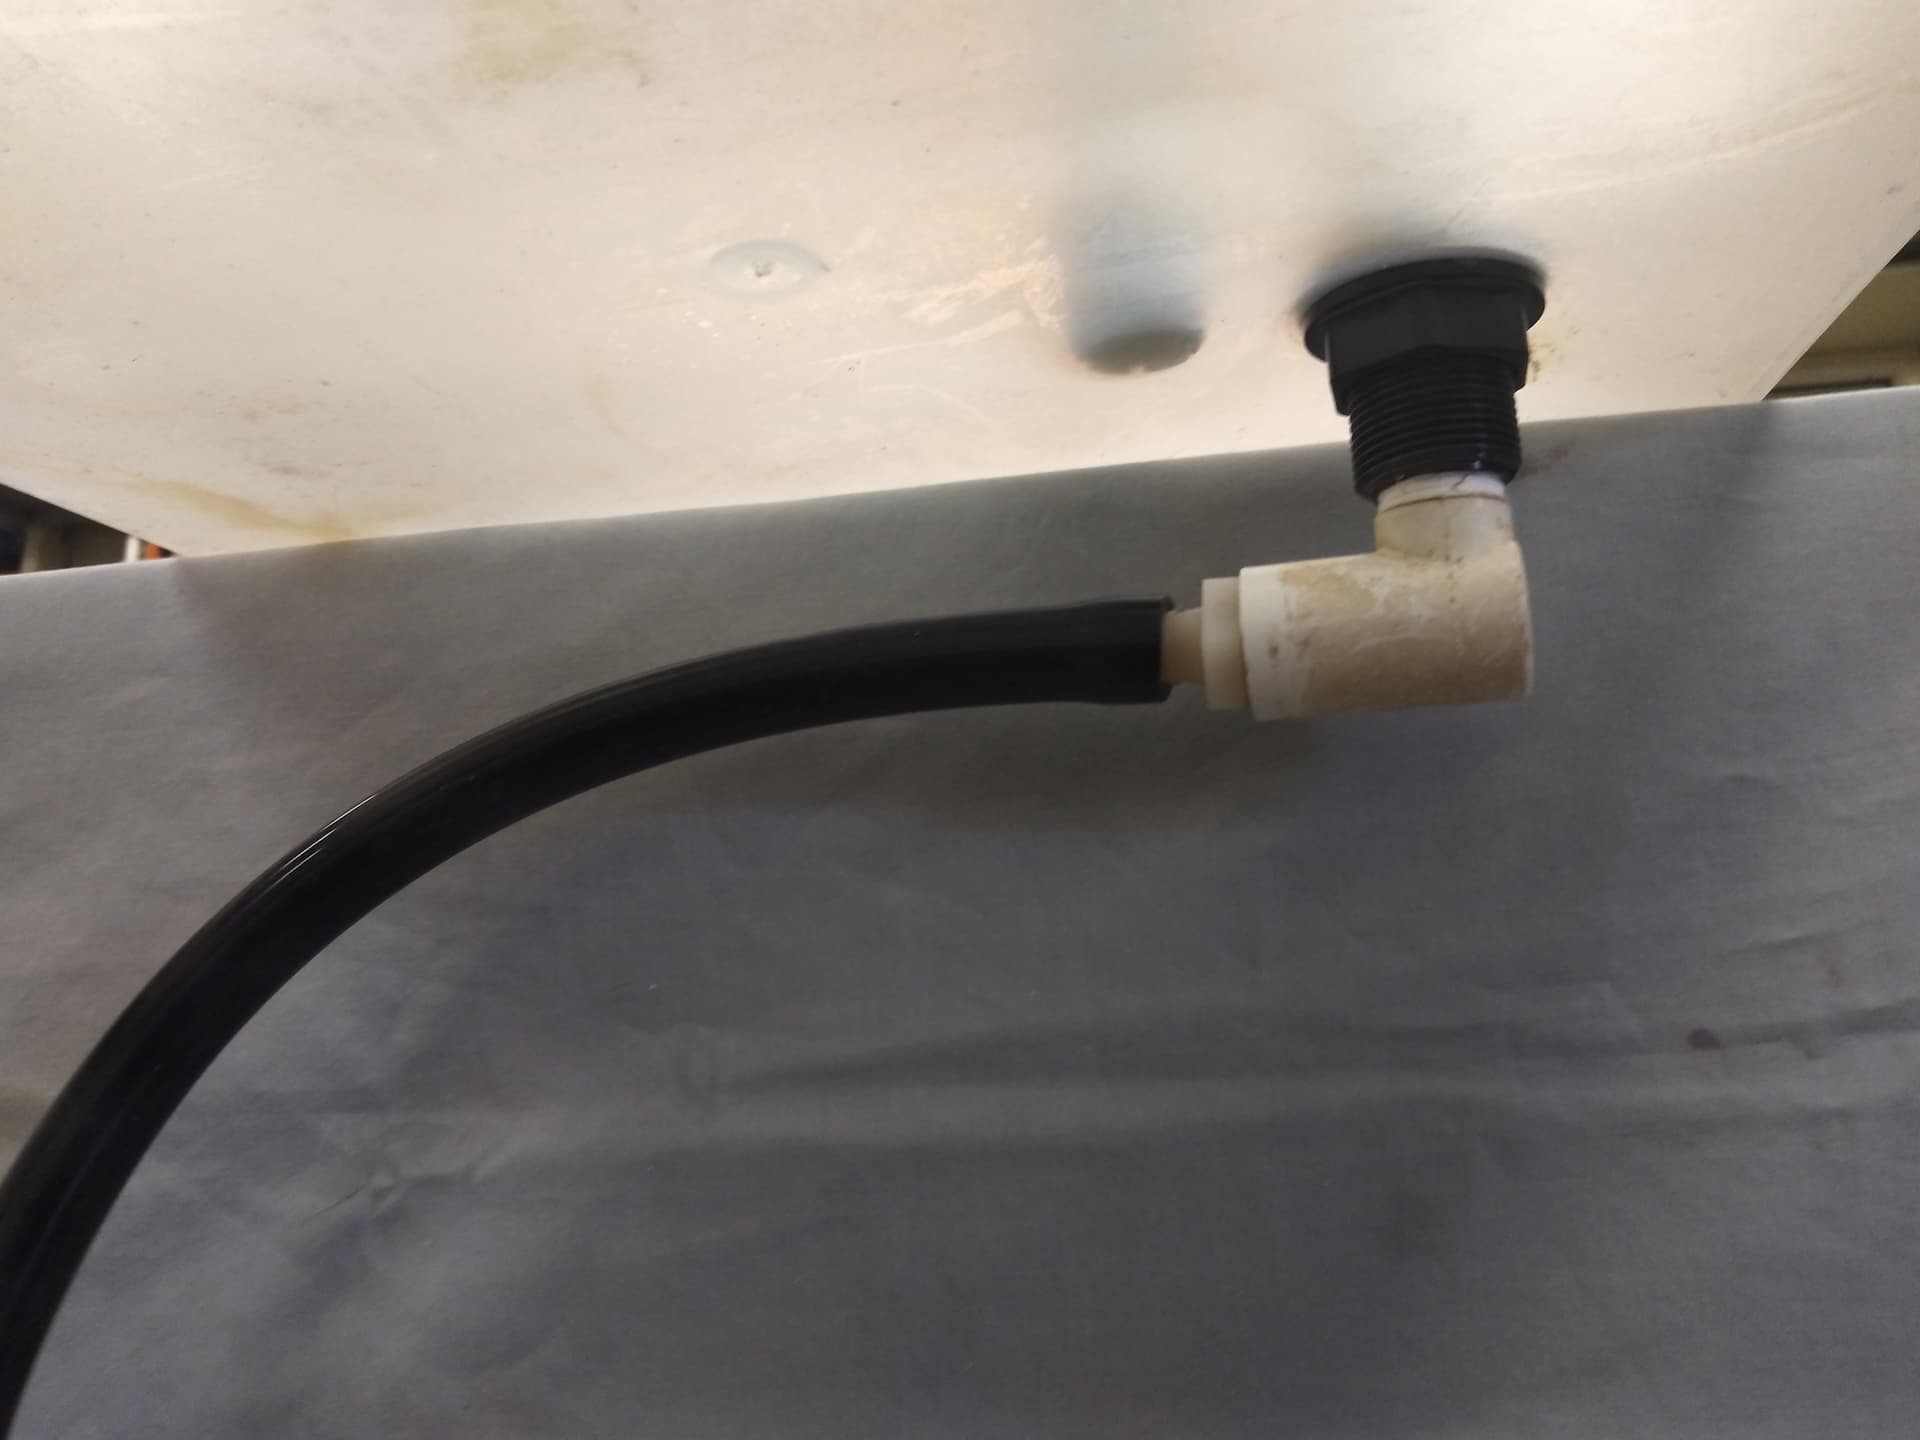
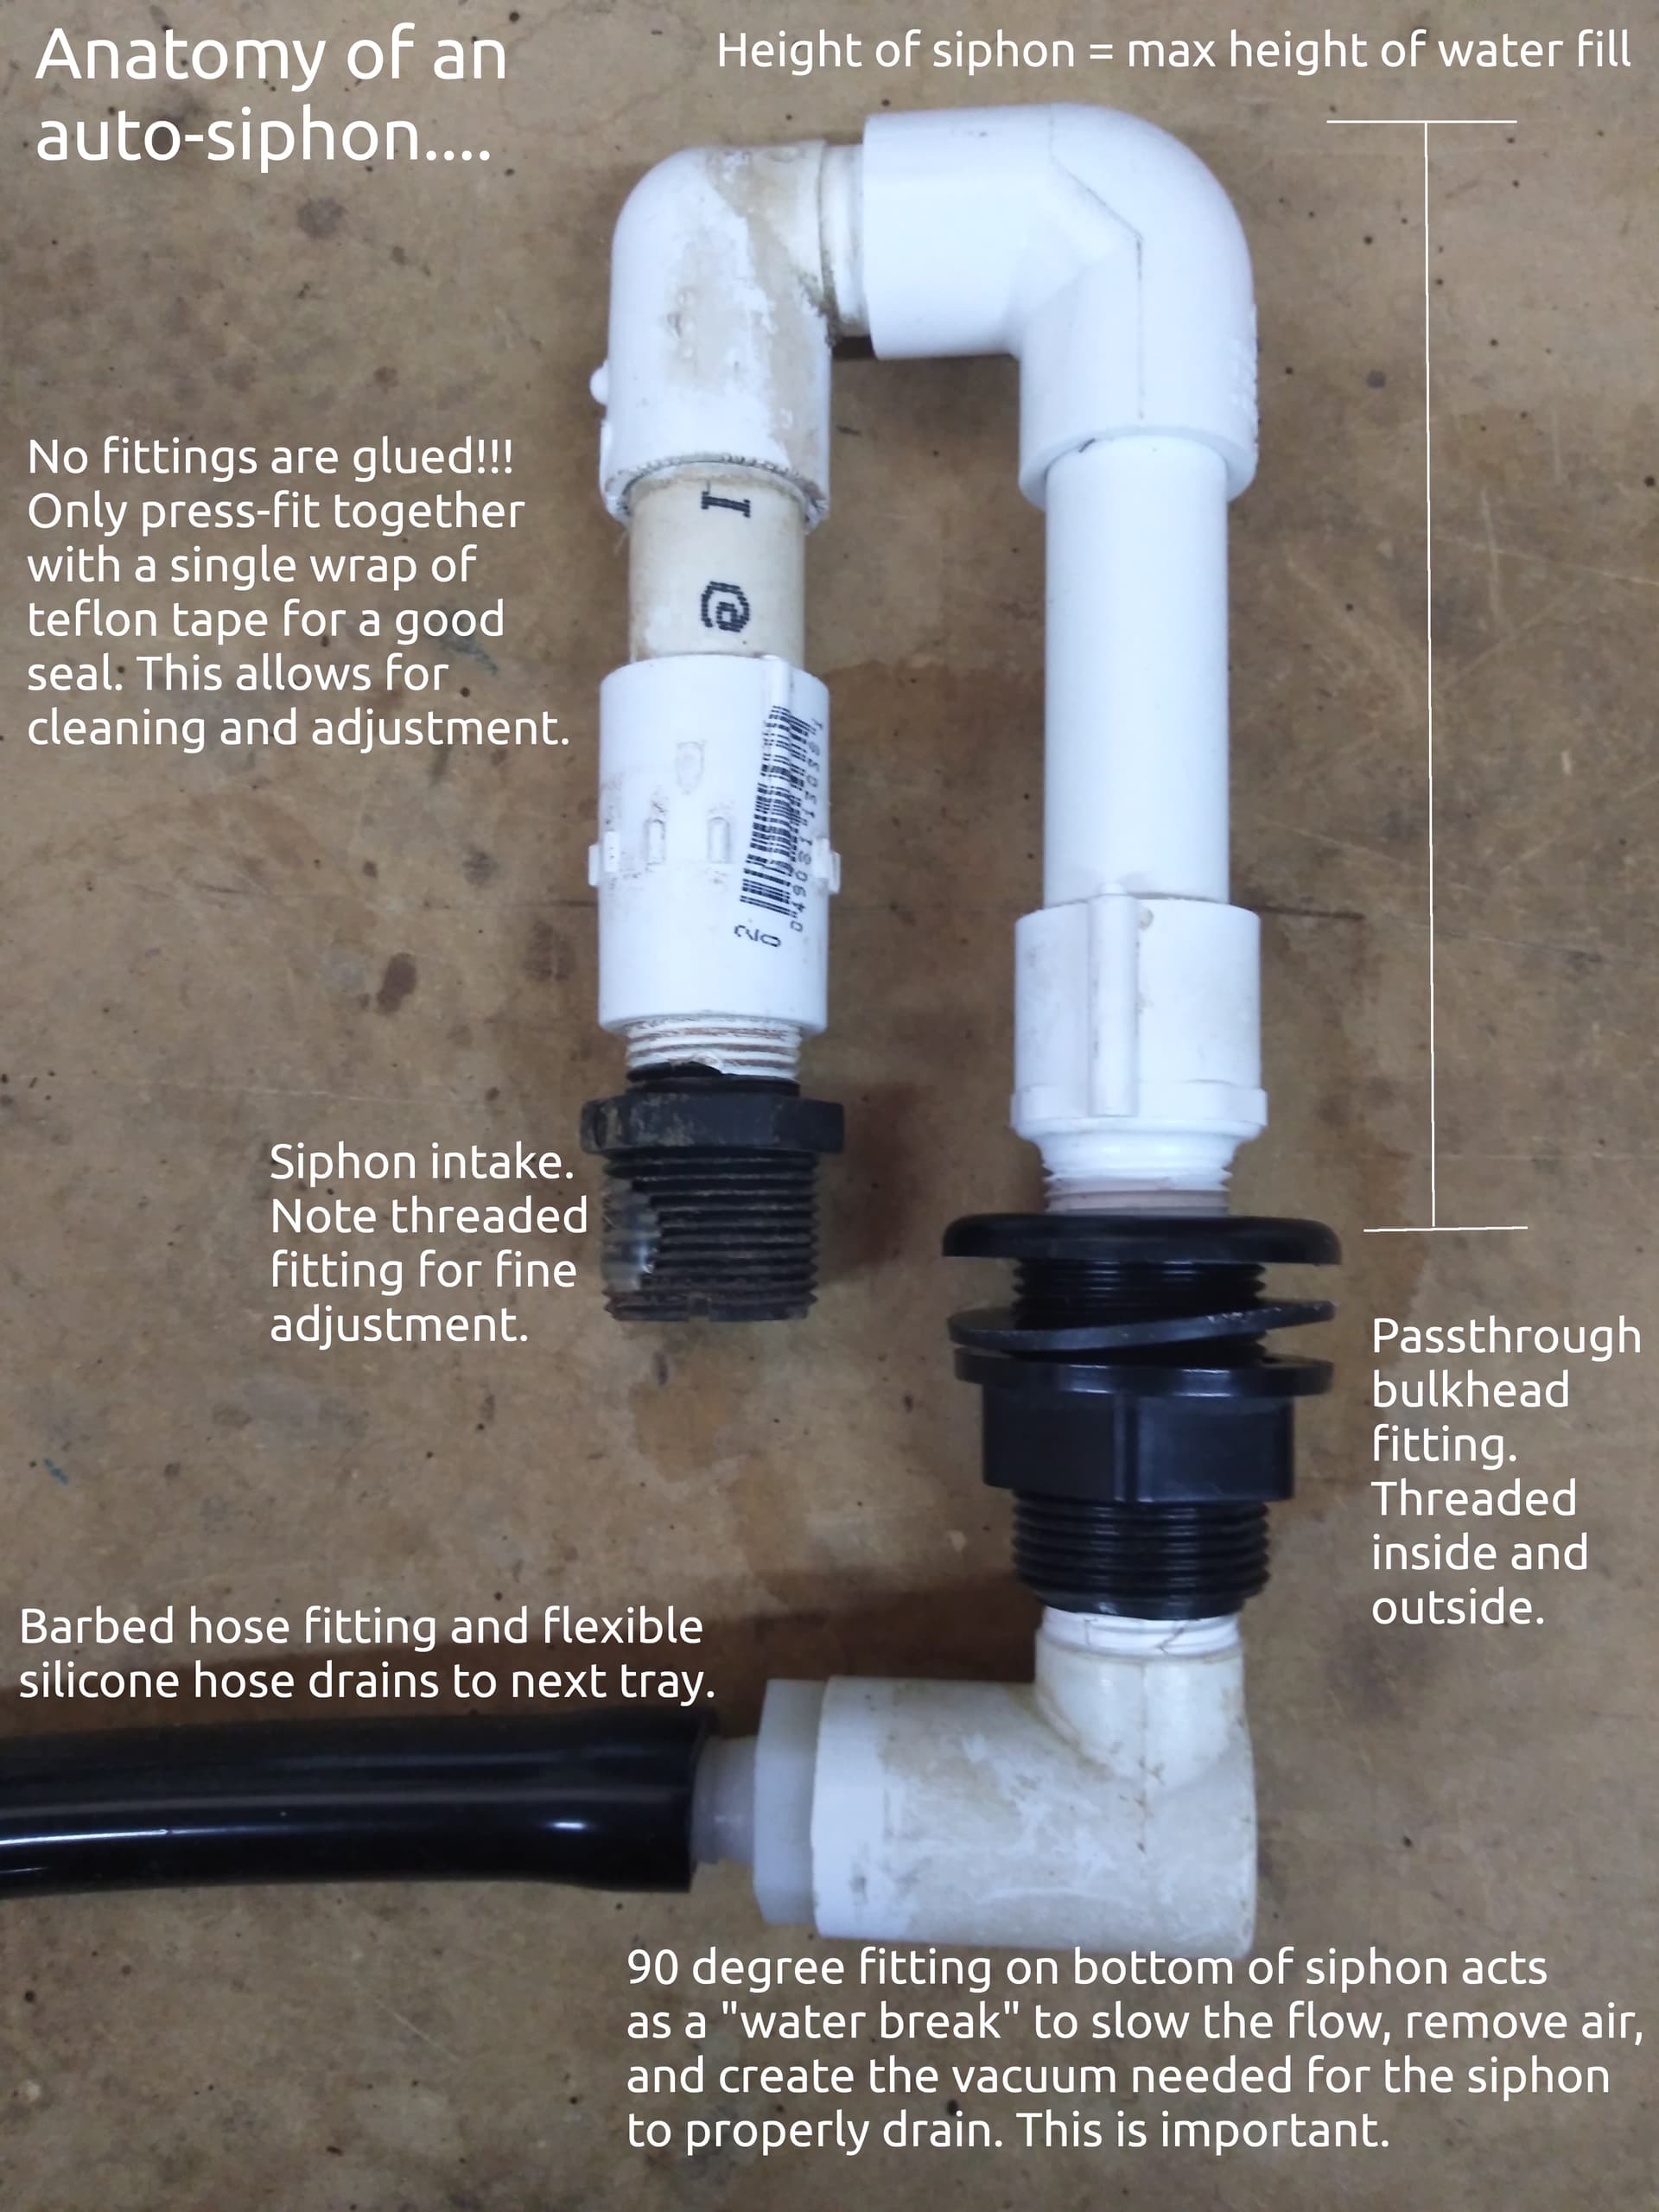
They tend to leak at all their joint fittings, and you can’t glue those fittings together, because you need to be able to remove the plants and take the whole system apart at least once every month or two to clean out any algae or bio-film growth, otherwise all your plants could die, or you have to use specialized and expensive algaecides that are safe for food use as most algaecides can also damage your plant roots and reduce yields. A trough system also does not use any grow medium, which means there is no physical support for the roots or to hold up your plants once they get bigger. This also means all your roots will get tangled together in the trough and make it impossible to remove the plants for inspection or pruning or cleaning out the system. A trough system also requires that your watering pump is running 24/7, and if the pump fails, your entire crop can die within hours, because there is no grow medium acting as a buffer for water retention. Trough systems are also not very flexible or adaptable to a wide variety of plants, they are best suited to small or short crops like lettuce and other salad greens. If you plan on growing mostly salad greens, a Deep Water Culture, raft type system, or flood & drain table would be better options due to their simplicity, much lower cost, easier maintenance, flexibility, adaptability, and scalability.

As far as combining your hydroponics and mushroom cultivation in one room, that is probably not the best approach. Although Mycodo is fully capable of running multiple “zones” or grow spaces simultaneously, your mushroom fruiting chamber probably should be isolated or separated from the hydroponics part of the system because the mushroom chamber will need to run at slightly lower temperatures and much higher humidity than the hydroponics. Running the hydroponics at the same temp and humidity as the mushroom chamber will invite mold growth which could destroy your entire plant crop very quickly. You will also probably want to vent the mushroom fruiting chamber out of the room or directly to the outside of the house to prevent any possible humidity and spore buildup in your house or hydroponics area.

Mycodo will run on most systems that can support Debian-based OSes, but If you plan on NOT using a Raspberry Pi, you may end up having problems if you need to use any direct-connected sensors since there will be no GPIO bus. You can connect sensors to an ESP32 and send telemetry over your LAN via MQTT, or add a 3rd party GPIO bus device, but you will probably have to do all of the custom programming to make it work with Mycodo since I believe Mycodo is currently only setup to work with the Raspberry Pi GPIO and a few other GPIO-compatible SBC devices. This also goes for any of your outputs, you will have no way of directly-wiring your output control relays to your server, and will have to use a 3rd party GPIO device or control outputs via WiFi using ESP32s running Tasmota or other custom-programmed firmware. This raises the possibility of reliability problems due to WiFi connection issues, and there is also always lag-time to deal with even on your LAN.

Again, keep in mind that the system in the video is more of a proof-of-concept than anything else. It shows what you can do if you want to take it as far as possible. If you are growing simple crops like salad greens, you absolutely do not need a nutrient metering / mixing system with all those peristaltic pumps that need to be calibrated. You will need to mix a new tank of nutrients once every 2-3 weeks or so, and that only takes about 15-20 minutes to do by hand. That’s also when you would want to clean out the tank and the rest of system and remove any sediment, algae, or bio-film buildup. You also don’t need an automated pH control system. Measuring and adjusting pH only takes a minute to do by hand, and you only need to check it every 2 or 3 days. PH meters are expensive, do not last very long, and require constant calibration and careful storage using special test solutions (another extra cost). It is much cheaper and easier to check pH by hand. I guarantee you that a $16 8oz. bottle of pH test drops will probably outlast most $100-$200 pH meter probes (since they are not designed for constant submersion). The ones designed for constant submersion cost about $400 and up just for the probe. If you were setting up a large industrial-scale greenhouse for commercial crop production, you would probably want these automation systems, but for a small scale system they are not cost effective, and are often more trouble than they are worth, especially if you are just growing salad greens.

Just some things you should really consider before you go out and start buying stuff :wink:

1 Like

We want to grow a variety of leafy greens, herbs and some cruciferous vegetables(spinach, lettuce, arugula, broccoli, cabbage, kohlrabi, garlic chives, etc). I was thinking tomatoes too, but given their size I think it’s best to grow those separately.

Regarding the cleaning and leaking fittings I was thinking using 110mm PP pipes and all the joints, bends etc come with gaskets so the chance of a leak is minimal when executed properly (I’m an ex-plumber).

I figure an alarm on the water flow sensor would alert me if the pump breaks or something hinders water flow and then keeping a spare pump readily available or even already hooked up ready to go?

A DWC system looks nice, but it looks very space inefficient for someone looking to mainly use vertical space? I’m comparing it to a simple NFT system where I can get 108-ish plants stacked up pretty easily in a couple of levels. Do you have any examples of a DWC raft type system of the same scale that’s very space efficient? I mostly find either commercial setups for the raft types or just small buckets for indoor setups when I google.

I was thinking more along the lines of separating the two inside one room, so that I could heat up the main room to the mushroom temp, then heat the hydroponics additionally. Though now that I think about it, “encapsulating” the hydroponics part would be much more difficult than the fruiting chamber. The fruiting chamber would exhaust to the outside and have its own humidifier. Sort of like a “martha” tent setup, but slightly larger around my racks. I’m very much in the planning/idea stage still, so I really appreciate your detailed and thought out response!

All the automation is definitely not necessary, but it’s something I find highly interesting and would love to learn more about, I love to tinker with all sort of stuff.

I’ll be looking more into possible solutions for the hydroponics system and again, thanks a lot for your very detailed and thought-out response! :smiley:

Ok… in your first post you said you wanted to “keep it as low cost as possible”.
The only pvc pipe I know of that uses gaskets is outflow pipe like the green sch 40 or 80 sewage pipe, which is the most expensive pvc pipe you can buy. I’ve done my share of plumbing work as well :wink:
I can not stress enough the need to be able to completely take apart the entire wet part of the system so that it can be cleaned on a regular basis. Anywhere you have light and water, you will eventually have algae and bio-films, there is no avoiding it, it’s a constant battle. Speaking from experience, it is a complete pain in the ass to try to clean algae and bio-films out of the inside of a pipe. If you really want to use this type of NFT system, I recommend you use actual NFT-purposed troughs like these that are designed to be taken apart for regular cleaning, these are what they use in the big commercial NFT greenhouses…

If you are looking to stack your plants to save space, than instead of a DWC system, I recommend a flood & drain or ebb & flow type setup. You can easily stack flood trays on shelves. These wire shelving systems work great…


They even make flood trays specifically designed to work with these types of wire shelving, however, these trays tend to be expensive…
image

You can also use any cheap plastic storage bin as a flood tray. I setup a stacked flood & drain system inside a 2x3x6 foot space using cheap common plastic storage bins for the flood trays, and it worked great for herbs, salad greens, and even tomatoes. If you are looking for a good hydroponics tomato I recommend the hybrid Patio Tomato, it’s a determinate tomato that only gets about 2 feet tall, but produces a lot of very nice fruit. It’s one of my favorite, I currently have 3 of them out in my garden. I recommend Dutch Buckets for growing hydroponic tomatoes. You can easily make your own Dutch buckets out of recycled laundry detergent buckets or cheap 5 gal. buckets from the hardware store, and use a top-down watering setup like drip irrigation.

Another thing to keep in mind is that in a hydroponics system you end up with smaller than average root systems since the plant is constantly getting the ideal amount of nutrients at all times… this means that your plants will often be top heavy, with absolutely no root support in the trough, even those little net-cups they sell for this are no good. I had plants that were constantly falling out of my trough systems because of this. This is another reason I switched to a flood & drain type system. Having the plants in actual pots with hydroton (leca) kept the plants upright, because they had full root support, you could even stake plants if needed, and the wet hydroton helps counterbalance the top-heavy plants. Having the plants in actual pots also allows for easy removal of the plants for inspection, pruning, transplanting, and cleaning. There is also less plumbing to deal with in a flood & drain system compared to a trough system… which means less cost, and less work… and less work is the entire point of any automated system :wink: Keep the system as simple as it needs to be to get the job done. The more complex the system is, the more cost and work it is to setup and maintain, not to mention having more possible points of failure.
Good luck with whatever you decide to build. :slight_smile:

Yeah, budget in Norway is likely a very different thing from a budget in any other country as sourcing ANY sort of “cheap” parts I see people use widely online is not available here at all or is majorly overpriced. Even just a simple shitty 4 gallon bucket is easily $15. The piping will be the least of my worries in terms of costs, I was more so looking at those crazy expensive EC/pH sensors that go for $200+ that I see a lot of people recommending.

I’ve actually been looking at importing a few things from Alibaba and those trough pipes, how are they leak proof? I can’t see any gaskets at all for the end caps and connectors, have you had any experience with them?

As for the flood & drain or ebb & flow systems, I’m not sure where to source or DIY such trays without spending a big chunk of $$$ in Norway, but I might take a look at Alibaba for that too. :upside_down_face: I have access to a lot of free aluminum racks w/adjustable shelves, so that part is covered.

Thanks a lot for the tomato tip, I will definitely take note of that!

Would using rockwool as a grow medium in combination with the net-cups in troughs help stabilize the plants or is it futile?

Less work is the point of an automated system, but it’s also… something that makes my brain tingle (in a positive way) with all the possibilities and DIY shenanigans it can lead to. :rofl:

I will keep researching and see what I land on, thanks again for the valuable input!

Ugh, that really sucks… I guess Amazon won’t operate there due to the lower pollution vs the huge delivery area they would need to cover. And $15 for a plastic bucket??? That reminds me of when I worked up in Alaska for a couple of summers. Everything was ridiculously expensive, we had to drive 120 mile round-trip every 2 weeks from Whittier to Anchorage just to stock up on supplies and groceries at the Costco in Anchorage.
If you decide to use EC or pH probes, expect to be replacing them every 6 months to 1 year, they can last longer, but you really need to keep them clean and properly stored in their calibrating solution, which is just extra work… To me, they are much more trouble than they are worth for a small system. It takes longer to calibrate a pH meter than it does to just check the pH by hand with a paper test strip or drops. If you are going to be using the same brand of nutrients and the same mix ratio all the time, then you really only need to check your EC once to double check it against the nutrient manufacturer’s specs and adjust your mix ratio up or down as needed, but as long as you use that mix ratio from that point on, you really don’t need an EC meter. I have one, and I hardly ever use it anymore. The way you keep your EC stable is to make sure you keep the nutrient reservoir topped off with fresh water at all times in between tank changes.

The trough and top-cap can be cut to length to suit your system, and then there are end caps that get glued on the trough so it will hold water, the top-cap stays removable for cleaning.

I purposely try to avoid “corporate solutions” whenever possible and go with re-use, re-purpose, re-cycle, and modify as much as I can. Commercial hydroponics parts are ridiculously overpriced considering how simple and cheap they are to manufacture. There is really no difference between a $99 manufactured-for-hydroponics plastic flood tray and a cheap $10 plastic storage bin from the local home-wares or hardware store. Getting creative and “hacking” things in ways they were never designed to be used so I can give the finger to the greedy corporate money grabbers is what makes my brain tingle :wink:

When I first started getting into hydroponics, I used rockwool all the time. But it’s not reusable, and as the plants get larger, the rockwool tends to start disintegrating and shedding fibers, which can eventually clog your system and the pump. Also, rockwool is made the same way fiberglass is made, do you really want to be growing your food in fiberglass? And when you eventually have to dispose of your used rockwool, it will never decompose, it will sit in a landfill basically forever. You also don’t really want to be breathing in any of those stray fibers, or getting them in your eyes. I will never use rockwool again, it’s a nasty and unsustainable material. They really need to stop using it in big commercial grow operations for all of the above reasons :frowning: . I only use peat moss cubes for rooting seedlings, and Hydroton or “LECA” for a grow medium, because leca is clean, safe, and 100% reusable, and it’s almost impossible to over-water when using leca. I find that mediums like rockwool and coco-coir tend to hold too much water and can lead to root rot, and they’re just messy.

Yeah and the $15 bucket is the cheaper ones, for a better quality one we’re talking easy $30. The prices makes me cry, especially so after the covid related bullshit price hikes in basically every category. Your Alaska experience is probably a close representation. :rofl:

  • taking notes - :spiral_notepad: :face_with_monocle:

Ah, if the top it removable even if the end caps are glued I get it. That looks like a good solution.

Yeah, me too, especially so in later years. Those plastic flood trays (or your DIY solution) what kind of sizes do they normally come in? This is the type of planting tray I can find available here and this is $35 + shipping for a 100cm x 40cm tray. :smiling_face_with_tear:

Very, very good points that I hadn’t considered. Leca is definitely the way to go then.

Try searching for plastic storage totes for under the bed. Rubbermaid makes one that is available in many US stores and I’ve built multiple systems with them! Just remember to paint the outsides black to prevent algae!

I’ve actually seen some growers just fill their entire NFT troughs with leca to give the roots something to hold onto, but leca can get heavy when saturated, so the trough will need to be properly supported. However, if you use this method, the plants can not be removed from the trough until they are harvested.

A tray like that is too shallow for flooding. You want the flood tray to be at least an inch or 2 taller than your tallest pot.
The tray will need to be flooded to at least an inch below the top of the grow medium in your tallest pot. This ensures the entire root zone is wetted every watering cycle.
The maximum water level in the flood tray is determined by the height of the auto-siphon.
The auto siphon is just a simple inverted U shaped pipe that can be easily made using common PVC plumbing pipe and fittings and a double-threaded bulkhead fitting that allows it to pass through the bottom of the tray for the return drain…
image
Here is one of my Dutch buckets with an auto-siphon installed…
Notice the threaded fitting on the pickup-end so that it can be adjusted as low as possible to ensure complete drainage.

And to prevent the flood tray from ever overflowing, you want the outflow rate of the siphon to be at least 2 times the inflow rate of the filler pipe or hose. This way, even if the pump gets stuck on for some reason, the tray will not overflow. In fact, leaving the pump running in this situation would be considered an ‘ebb & flow’ system where the tray is continually filling and draining all the time, as opposed to a ‘flood & drain’ system where you only flood the table occasionally and let it drain completely.
You want the inflow rate to be slow anyway to allow the medium to absorb the water, and prevent your pots from possibly floating if the tray fills too fast.
And the grow medium is actually providing the NFT situation in the root zone where the nutrient film is on the leca.

I am using inexpensive under-bed storage bins as my flood trays.
The under-bed bins are just the right depth for flooding 3 to 8 inch diameter cheap plastic garden pots.
They come in a variety of sizes, but are usually about 40-50cm wide, and in varying lengths, and usually don’t cost more than $15


Sometimes they have little wheels on the bottom, but they are easily removed if needed.

He’s in Norway, so availability of some of these things is an issue as is elevated cost. Use a VPN with an exit node in Norway and you’ll see how different internet shopping is :wink:

1 Like

I found those under-bed storage bins actually and was about to go buy them, but then I realized… I might not want to. The plan was to stack these in a rack to maximize the space since the room used for growing is a small 8m2 room, but the a mount of water during the flooding made me rethink? I don’t want that amount of water to suddenly, in case of a failure, flood and ruin my room, hmm. I’m too indecisive to land on a solution. Round 4" tubing is apparently a pain to clean for algae and eventual tangled roots as per this thread, so I’m not sure how to proceed.

I started thinking more about the mushroom fruiting chamber and decided to go with a martha tent setup first to keep it smaller and simpler. Now I already have a server up and running with docker, so I figured I might as well leverage that to run mycodo on there and use a ESP32 for the co2, humidity and temp sensors.

Can I also use the same ESP32 to control a circulation fan, fresh air fan and exhaust fan (12v PC fans) This will be my first ESP32 project. I also thought about using a mist fogger in a large reservoir tote with a fan attached, which turns on/off based on the humidity sensor to push the air into the tent as seen in other projects. Is this feasible or am I making some wrong assumptions?

Leaks and flooding are always a possibility with any kind of system, you just have to really think ahead about your design, this is why I say simpler is better, build a system that gets the job done with the least complicated design, and try to build in safe-guards and fail-safes to minimize disasters… such as making sure the outflow rate from your flood trays is greater than the inflow rate to prevent any overflows even if the pump gets stuck on for some reason. If you don’t want to trust the water pump to a raspberry pi or other computer running software, you can just use a simple wall-outlet timer which is much more reliable. Also, your stacked trays will not all be filled at the same time, only one tray at a time really needs to be filled… you just fill the top tray until the siphon starts, then allow the pump to run a minute or so longer after the siphon starts, and then gravity will do the rest as the water cascades down through each tray one at a time.

I have never tried running Mycodo on anything except a Raspberry Pi. The only real issue is that if you are not using an SBC then you don’t have any GPIO pins for direct wiring, unless you add a 3rd-party GPIO module.
You can just use remote ESP32s with your sensors attached, but of course you then also need to run an MQTT broker.

You can use ESP32s running Tasmota to control 4-wire computer fans using PWM. It should be possible to send speed changes to the fan from Mycodo using mqtt. Most of the ESP32 dev boards run on 5v from the USB plug, but the ESP32 microprocessor itself (and it’s GPIO) runs on 3.3v, so you’ll need a separate power supply for the fans… or have a 12v PSU for the fans, and a 12v to 5v DC buck converter to power the ESP32.
It should be possible to have an ESP32 perform multiple functions, especially if you are controlling it from Mycodo. For instance, you might have a temp/humidity sensor and a fan attached to an ESP32, Mycodo can read data from the sensor via mqtt, use that data in a Function, and then send an on/off or PWM speed change command to the fan via mqtt.

1 Like

Yeah, my mind went to Kratky when I tried to simplify it, then realized it’d be too much water in the rack at once for me to feel comfortable with it. Then I looked at the RDWC and found this example:

which looks perfect for me, the racks I have access to are about the same size as this, give or take. The guy who posted it gave no explanation to how the water flow works, so I’m still curious. But then it’s the water amount in the shelf that may (or may not) be a problem.

My mind’s working on a bunch of other things, so thinking clearly and focus-oriented is hard these days. :grimacing: But given what we’ve discussed here it seems to be a safe bet to just buy the under-bed totes and the reservoir tote as a start and then go from there.

Just to clarify for myself:
With your auto-siphon idea I’d just make the top one siphon into the one underneath and so on, making sure that the siphon has twice the flow rate of the inflow to prevent overfilling.

If we take the rack I posted above as an example, what would be the best position of the siphon in the bottom and the inflow on the tote below it? On the side? Straight through the top? This siphon setup requires there to be pipes connected to the underside of the tote, which isn’t ideal for my rack with solid steel shelving. Would this kind of siphon be a better fit? Any downsides you can think of?

u-siphon-for-aquaponics

I see there’s a docker option, so I imagine it should work fine. I already run an MQTT broker for HA.

Perfect, thanks for that info!

I would never use a Kratky system because there is no air pump keeping your water oxygenated. Your water/nutrient mixture can very quickly go ‘stagnant’ and grow all kinds of pathogens that will harm your plants. You would need to change the water very often in a Kratky system. Also, since there is no water movement or agitation, it would be a breeding ground for fungus gnats and mosquitoes.

Now you’ve kind of lost me… that DWC rack is going to be holding a LOT more water than a flood and drain system using the same rack design… the DWC has all of it’s trays always full of water.
In a flood and drain, you would only have to fill the top tray, and then gravity would let the water flow down to each tray one by one after the top tray gets filled to the point the siphon starts draining down to the next tray.
Also, I’m not understanding how that racked DWC is preventing all of the water from those trays from draining down to the main reservoir at the bottom and causing it to overflow… in that system design, the total water volume in the system is more than the main tank can hold. I’m assuming there is a pump that needs to run 24/7… I would avoid any kind of system that needs to have the pump always running.

You will need to buy your totes or bins or whatever you plan on using for the flood trays and then get a bunch of garden pots of the size you plan on using and then place them in the totes or bins and see how they fit and where there is room in-between them to fit the siphon.
Like this…
8 inch pots…


6 inch pots…

The fit of the pots is not going to be exact or perfect… it is what it is, but it will still work just fine.

You don’t need hard pipes joining everything, use 1/2 or 3/4 inch silicone hose and barbed fittings on the bottom of the auto-siphon. Use black hose or some other dark color that doesn’t let light into the hose and you’ll never have to worry about cleaning them. Since there is no pressure in the drain hose, you only need the barbed fitting, no hose clamps are needed.
Like this…


Yes, you will need to cut a hole in the shelf where the siphon passes through the bottom of your trays. This is just one reason you need to do as much fore-planning as possible before actually building anything. You can try to pass the drain through the side of the tray, but I would not recommend it because it might make it more difficult to get the intake as close to the bottom of the tray as possible, and also the thin plastic wall of the tray might not support the weight of the pipes or hoses hanging cantilevered from the side of the tray. Remember, there is dynamic load applied every time a watering cycle happens.

As for the siphon itself… I made mine out of 3/4 inch PVC pipe and a few threaded fittings to attach it to the double-threaded bulkhead fittings I used.
You can mount the siphon anywhere, but you want the intake to be at the lowest point possible in the tray to remove as much water as possible so as not to leave any standing water. Ideally, the intake should be about 1/8 to 1/16 of an inch from the bottom of the tray. Removing all the water is impossible, there will always be a little water left, but as little as possible is best to prevent algae growth. If you see algae in the bottom of your trays, just spray it with a little peroxide and it will kill it, or wipe it off with a paper towel.
None of these pipe fittings on the siphon are glued together… since there is no positive pressure in the siphon, there is no need to glue it, they are only press-fit together, if there was any air or water leakage, I simply wrapped a little teflon tape around the end of the pipe and then pressed it into the opposite fitting for a better seal… this way I can take apart the siphon for cleaning and also to make adjustments if needed.

The siphon flow rate will be whatever it ends up being… you will need to control the inflow rate using a simple valve on the inflow hose. Also, it is important that you make sure the inflow hose does not end up siphoning any water from the flood tray back down to the tank… this is very important. If the inflow hose becomes a siphon when the pump stops, it will throw off the volume of water available to cascade to the next tray and may cause the next trays to not fill enough to continue draining all the way. Also, if the inflow hose siphons water from the flood tray back into the pump, it could draw debris into the pump’s impeller chamber and cause damage the next time the pump runs.

Also, do not use a “bell siphon”. Bell siphons tend to not drain the flood table enough and leave too much water behind… they are great for ebb & flow systems where the pump is always running and you are continually filling and draining the flood table all the time. But for a flood & drain system where you only flood the tray once every 3-4 hours or so, you want to drain the trays as much as possible to reduce any standing water where algae can grow.

Hey, I am that guy! That’s my setup from about 4 years ago in my college living room. Did not expect to see this!

In this setup, water flows from the central reservoir on the bottom to each of the 3 grow levels via one 3/4" PVC pipe. There are 3 ball valves, allowing me to adjust water flow, and completely shut off a level if needed.

On the right side of the grow trays is the water return, each a separate 3/4" PVC pipe back to the central reservoir.

This system fills and drains from the back of each grow tray, not the bottom.

Have fun, building hydro systems and learning new designs is half the fun!

1 Like

Oh, and by the way, that picture was from 4 years ago, and I’ve had the system and other similar designs running ever since, and have yet to experience any kind of horrible spill. If I had it was definitely my fault not the design.

1 Like

What prevents water from flowing out of the trays on the shelves and overflowing the main tank at the bottom? Are the inflow and outflow ports for your shelf trays placed just below the lip of the tray?

Is there any way to avoid having pots in there and instead use those inserts shown in the RDWC rack above? Am I misunderstanding something about the ebb & flow setup you’re proposing? Do you not use lids on the totes in those systems?

My first thought was to fasten the pipes/hoses to the rack itself, so there would be no stress on the boxes. I need to actually sit down and draw this so I get some clarity, heh!

Good information!

Thanks for the heads up!

Damn, what a coincidence! :laughing:

Interested to see the answer to this!

Also - am I safe with opaque totes or do I need to paint them black? There are no alternatives to opaque bed totes in Norway as far as I can tell, at least in my vicinity.

1 Like

Yes, you’ve got it. The drain port is near the top, as water is added into the tray it trickles out the outlet. So even if pumps fail you’ve still got a large amount of water in each grow tray.

1 Like

Flood and drain would use the totes, with pots, and no lid. No need to worry about painting the totes with the flood and drain since they will not be full of water all the time and you don’t really need a lid. Any algae that may grow in the film left at the bottom of the tote can be easily sprayed with peroxide or just wiped away since it’s easy to remove the pots.

DWC would use the totes, with lids, and inserts in the lids… but you would need to cut those holes, and if they are not precise, your inserts can sometimes fall out if the plants get large and top-heavy. Also, the lid might need to be reinforced to support the weight of the plants and the inserts. And since the totes are always full-to-the-top with water, you would definitely want to use opaque (or painted) totes & lids to keep as much light away from the water as possible. If the totes are opaque, they really don’t need paint.

The main reason I don’t recommend hard pipes and instead use silicone or even vinyl hose is so that it’s easy to disconnect the hose and remove the whole tray for cleaning if needed. Design everything as modular as possible for ease of cleaning and repairs. Lets say one of your trays gets a crack and you have to wait to get a new one… you’ll want to be able to bypass that one tray and still keep the rest of the system running until you can replace the bad part. Try to keep the design a little loose, flexible, and adaptable. I believe creativity and improvisation are very important design factors in any home hydroponics system… get weird with it and repurpose every-day things in ways they were never meant to be used :crazy_face: