Here is a method to precisely control VPD (Vapor Pressure Deficit) using a simple Bang-Bang controller (humidistat) instead of a PID controller. While a perfectly tuned PID controller might be more capable of maintaining a perfect VPD level, PID controllers can be difficult to tune, and they tend to take some time to “settle” into a perfect rhythm. PID controllers may also not handle sudden drastic changes in temperature or humidity as well as a Bang-Bang type controller. VPD doesn’t need to be absolutely perfect all the time, as long as you are maintaining an average that is close to the set-point you want, your plants will benefit and be much happier than with no humidity control at all.
IMPORTANT! : Before you start, it is critical that you already have very good control over the temperature and air circulation in your grow space! If you can’t maintain correct and stable temperature in your grow space, you will have a very difficult time maintaining VPD! To calculate proper VPD you really should be using the actual leaf temperature using a sensor that is in contact with the leaves of your plants, or using a non-contact infrared temperature sensor. This can be difficult and time-consuming because plants actually grow and move over time so you have to constantly adjust the sensor… so it’s just simpler to approximate the leaf temperature by subtracting about 5-6 degrees F from the ambient air temperature in your grow space. I derived this 5-6 degree offset by using a non-contact temp sensor over a full 4-month grow period and I never saw the temp difference between air temp and leaf temp go much outside 5-6 degrees F while maintaining day temps of about 77F and night temps of about 69F. My LED grow lights were kept about 6-8 inches above the canopy… this distance will vary depending on the lights you are using.
Also very important… to avoid mold and mildew, you want to make sure that you never go over 70% humidity for extended periods of time… which means that, if possible, you need to keep the temps in your grow space BELOW 78F AT ALL TIMES. Remember, we are using the VPD measurement to control the humidity, which means if the temps get too high, the RH must also rise to lower the VPD and keep it in range. The goal is to have a relative humidity somewhere between 60-67% with temps between 69-77F. You also need to be mindful of leaf condensation at night when temps fall and RH spikes… good air circulation is the best prevention. It’s not really necessary to run VPD control at night during lights-off since plants respirate differently when they are not photosynthesizing.
(NOTE FOR CO2 USERS: If you are using CO2 in your grow space to enhance growth, you can push your maximum temps up to 85 degrees F during lights-on. The “ideal” VPD does not change when using CO2… it is still about 0.8-0.95 for veg and 1.0-1.2 for flower. However, when using CO2 you will need to modify your venting method from what is described here in this How-To.)
You will also need to have good control over the intake air circulation coming into (or being extracted from) your grow space. I’ve found the easiest way to do this is by being able to control fan speeds using PWM computer fans as intake or extractor fans. Check the specs on your fans and find out what their “cubic meters per hour” is rated for. Using computer fans will only work for smaller grow spaces, like your average size grow tent. If your grow space is larger than 6’x6’, you will probably need to use larger in-line duct style EC fans that can be speed controlled. This will be a little more complicated due to how EC fans need to be controlled. (Regular AC powered fans CAN NOT use PWM for speed control! PWM is only for DC motors!)
I have a fairly small grow space of 2x3x6 so only about 1 cubic meter (about the size of a small grow tent). I am using 2 140mm PWM computer fans that combined can move 268 cubic meters per hour at 100% speed, so even on low speed (20% PWM), I can still effectively exchange the air in my grow space once every minute. Being able to adjust your fans from a low to high air exchange rate is important so that you can also quickly lower the humidity if it ever gets too high, like at night when temps crash and the RH spikes. Good air exchange rate and circulation is also VERY important in preventing mold growth in your grow space.
Keep in mind though that too much air circulation will drive down your humidity too fast making your humidifier run more often than it needs to, and thus needing to be refilled more often. It’s a bit of a tricky balancing act, but very worth the effort to get it dialed in.
I really like the Noctua fans… 150,000 hours MTBF rating, super quiet, lots of size and RPM options, top quality, low price, and a full 6 year replacement warranty!
https://noctua.at/en/products/fan
Once you have good temp and air circulation control, then you can easily control VPD humidity levels with a properly sized humidifier. Most of the commonly available ultrasonic humidifier “pucks” can vaporize about 1/2 Liter per hour. Just one puck is sufficient for 1 cubic meter of space. However, I am using 2 just to get faster response times.
There are many inexpensive DIY humidifier kits available on Amazon or Alibiba. Sometimes you have to buy the power supply and the floats for the pucks separately. I used my kit inside a 5 gallon laundry detergent bucket with intake and output vents cut in the bucket lid for air flow. With everything tuned well, I only need to refill my humidifier every 4-5 days or so.
https://www.amazon.com/s?k=ultrasonic+mist+maker&crid=3O06FWLK7R069&sprefix=ultrasonic+mist+maker%2Caps%2C259&ref=nb_sb_noss_1
One more important note, this will work best if you can position your humidifier directly in the downstream breeze of your grow space fresh-air intake vent, whatever that may be in your system. This will force the fresh dry incoming air to mix with the vapor from your humidifier inside your space. This will help evaporate and disperse the water vapor through your grow space and raise humidity rapidly, the evaporating mist will also have a significant cooling effect on the incomming air and can actually lower your grow space temps several degrees!
THE SETUP:
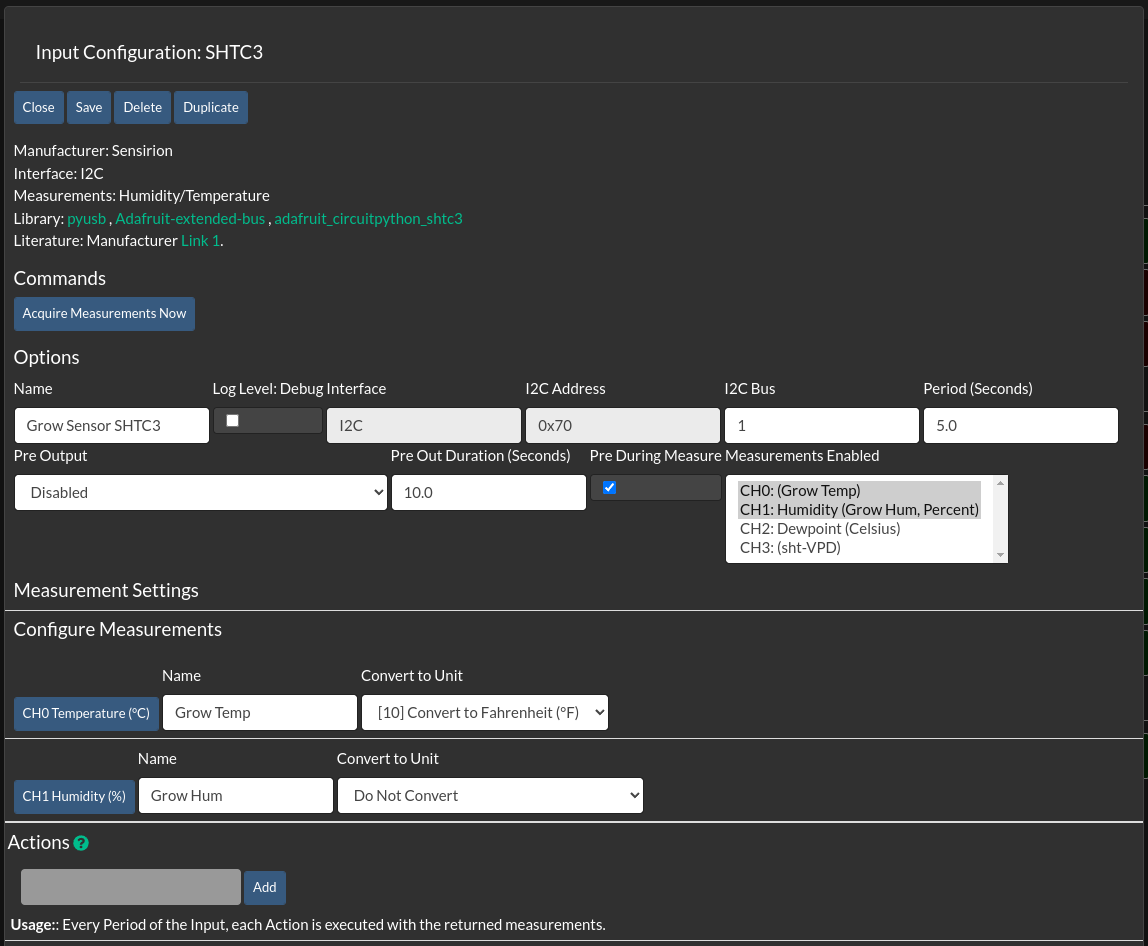
I am currently using a SHTC3 Temperature and Humidity sensor to acquire the measurements needed to calculate VPD. It is not necessary to use a sensor that can read air pressure, only temp and humidity are needed. Also be weary of certain sensors such as the BME280 that have problems with the humidity sensing element becoming “saturated” over time and causing their humidity readings to become quite inaccurate. The SHTC3 and SHT3x or SHT4x series sensors are all good sensors to use and relatively inexpensive.
This method uses 2 equation Functions and 3 control Functions:
CALCULATE FOR APPROXIMATE LEAF TEMP
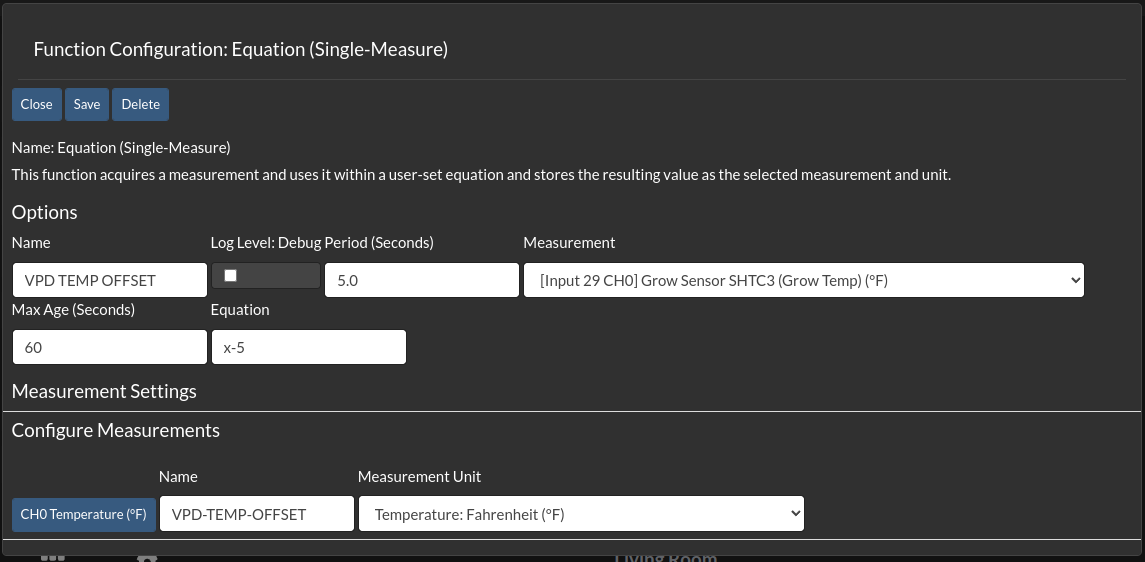
Setup the Equation (Single-Measure) Function to subtract 5-6 degrees F from your grow space air temp sensor to approximate leaf temperature.
CALCULATE LEAF VPD
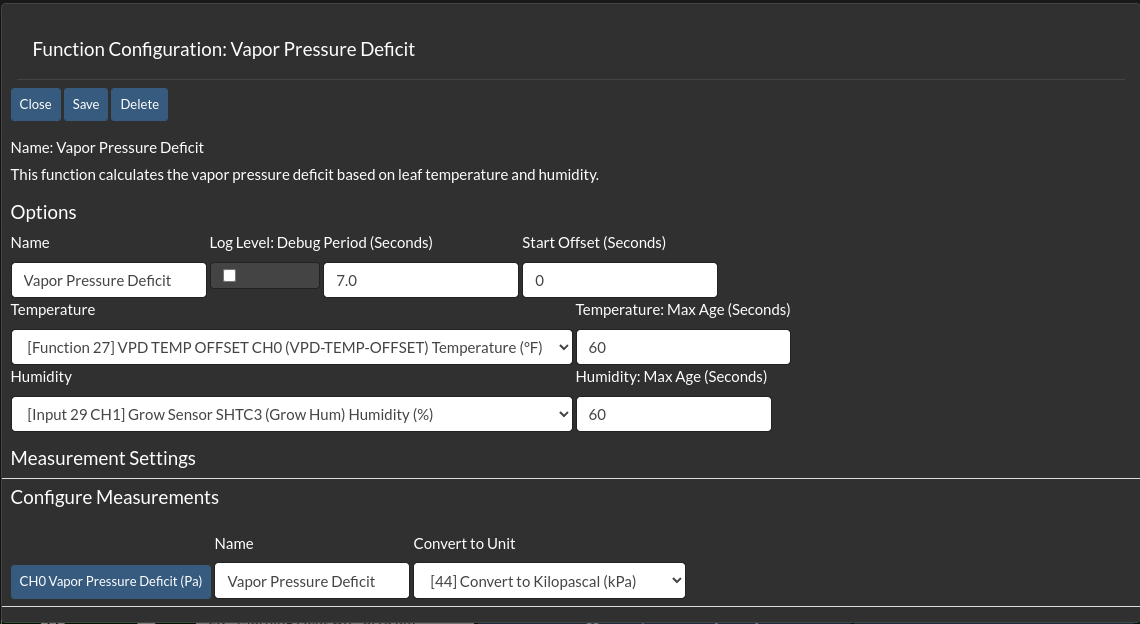
Setup the Vapor Pressure Deficit Function to calculate approximate leaf VPD.
VPD HUMIDITY CONTROL
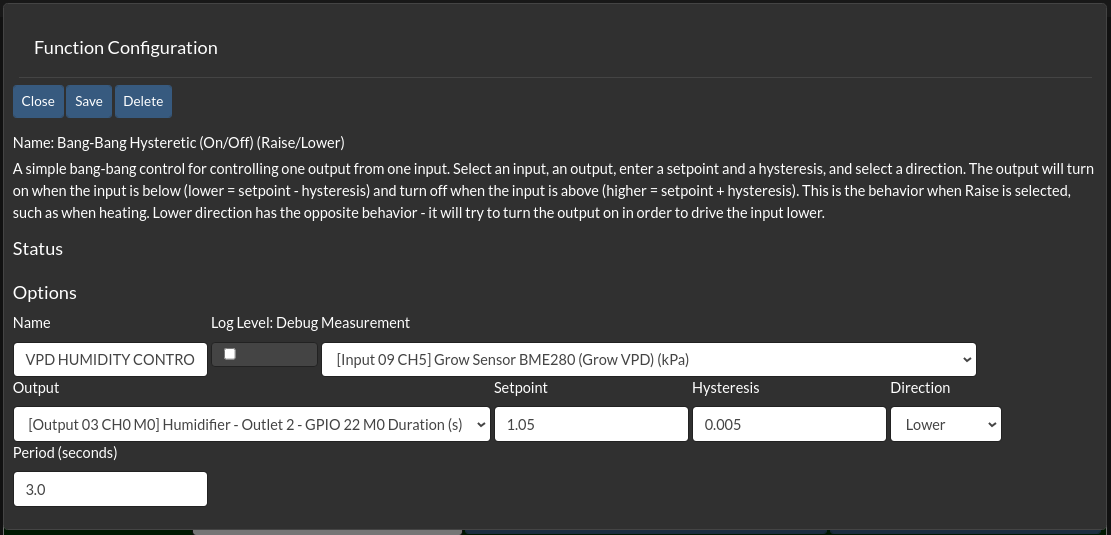
Setup a Bang-Bang Hysteretic On/Off Raise/Lower function - Monitors the VPD measurement from the VPD Function to LOWER VPD (raise humidity) relative to temperature by activating the Humidifier Output as needed.
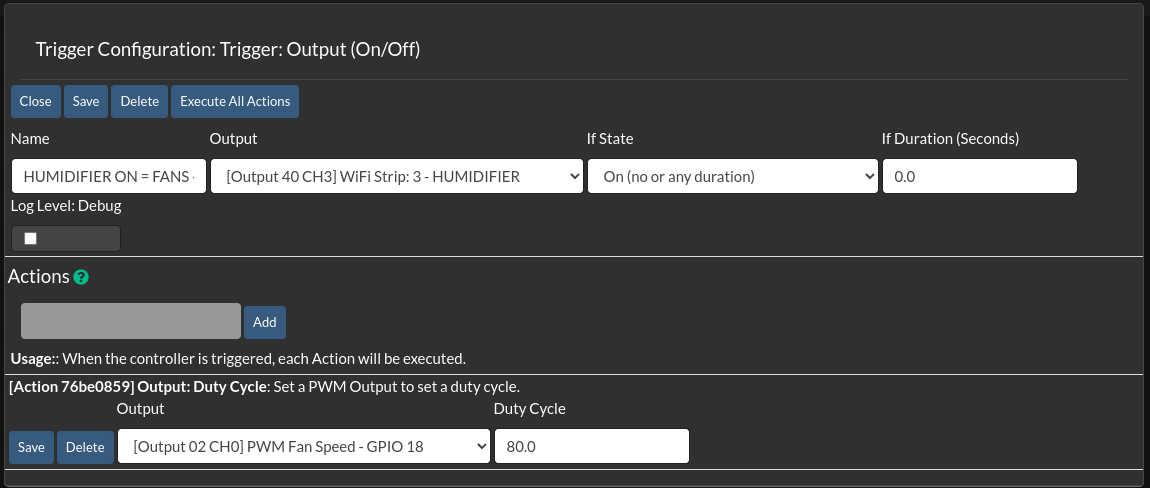
HUMIDIFIER ON = FANS HIGH
A Trigger: Output On/Off function - Whenever the humidifier is on, this function increases intake air fan speed to help disperse the humidifier vapor more evenly and quickly in the grow space, raising humidity rapidly.
HUMIDIFIER OFF = FANS LOW
A Trigger: Output On/Off function - Whenever the humidifier is off, this function lowers the intake fans to a lower “idle” speed, reducing air circulation so as to not lower the humidity too fast (this keeps the humidifier duty cycle lower and uses less water).
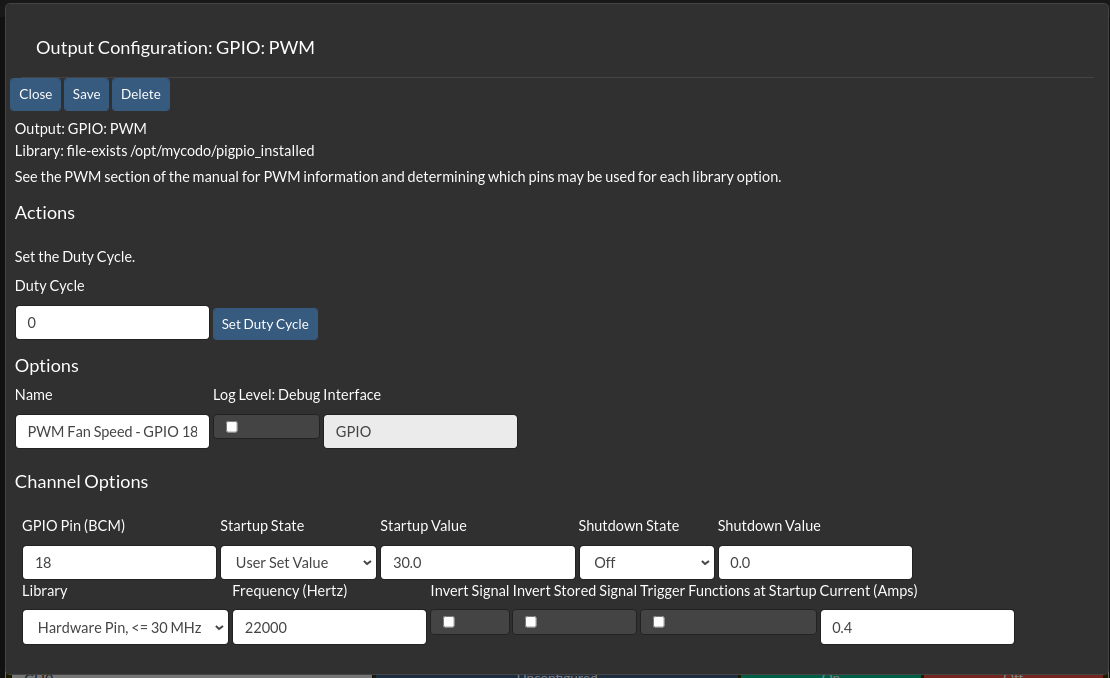
In the Mycodo Outputs page, make sure you have PWM control setup to control your fan speed for your intake or extraction fans.
Next, in the INPUTS page, make sure the sensor you are using has the capability of measuring temperature and relative humidity. In the sensor’s Input setup, select only the Temperature and Humidity readings. If your sensor has it’s own VPD measurement, DO NOT USE IT as it will calculate VPD based on air temp instead of leaf temp. Also, dew point is not needed, unless your grow space is going to get very cold for some reason. Configure the temp and humidity measurements, save settings, close the settings popup, activate the Input, and verify you are getting temp and humidity measurements by going to the Live Measurements page.
Next go to the FUNCTIONS page and add an Equation (Single-Measure) Function.
We’ll call this “VPD Temp Offset” or something similar. In the ‘Measurement’ field, select your grow space sensor’s temperature reading (this will be the air temp in your grow space). Then in the ‘Equation’ field type “x-5”. This will subtract 5 degrees F from the air temp reading and give you the approximate average leaf temperature in relation to the air temperature. In the ‘Configure Measurements’ section enter the ‘Name’ as “VPD Temp Offset” or “VPD Leaf Temp” or something to distinguish it from your other temp measurements. Save the settings, close the popup, activate the Function, and check the Live Measurements page to make sure it’s working.
Next, add a Vapor Pressure Deficit Function. In the ‘Temperature’ field select the “VPD Temp Offset” measurement you just setup in the previous step. In the ‘Humidity’ field select the “Humidity” measurement from your grow space sensor. In the ‘Configure Measurements’ section enter the ‘Name’ as “Leaf VPD” or just “VPD” and select “Convert to Kilopascals kPa” in the ‘Convert to Unit’ field. Save the settings, close the popup, activate the Function, check the Live Measurements page.
Next, add a Bang-Bang Hysteretic (On/Off) (Raise/Lower) Function. Name it something like “VPD Humidity Control”. Open the function settings and in the Measurement field select the VPD measurement you setup in the previous step. Then in the Output field select your humidifier. Next, set the Setpoint… “ideal” VPD for most plants is usually somewhere between 0.80 and 1.15 kPa. I set mine around 0.85 kPa for seedlings and vegetative phase, and around 1.10-1.2 for flowering or fruiting phase. Next, set the Hysteresis… I set mine to 0.005 kPa to avoid large swings or “jitter” in the VPD levels. You can set yours to suit your environment… this takes a little playing with to get it dialed in depending on your air circulation and the size of your humidifier vs the volume of your grow space. Next, set the Direction to LOWER (we want to LOWER the VPD by raising humidity). Last, set the Period… this will take a little playing with too depending on how fast or slow the conditions in your grow space changes. I keep mine around 3-5 seconds for very tight control and less swings/jitter. Save settings and close the settings popup. (In order to use such small Period times, you will need to be running Mycodo on a Pi 3B+ or better AND using at least a V30 rated SD card (or an external SSD). Anything less will cause problems due to the high I/O and database read/write cycles and the SD card not being able to “keep up” with the Pi.) Save & close, but do not activate this Function yet.
Now add a Trigger: Output (On/Off) function and open that function’s settings popup. Name this one “Humidifier on = fans high”. Set the Output to your humidifier. Set the If State to “On (no or any duration)”. Leave the If Duration at 0. Now in the Add Action field select Output (Duty Cycle) and click the Add Action button. In the Controller ID, select your PWM output that is controlling your intake/exhaust fans. Now select a Duty Cycle around 70% to start with. Click on the Controller ID Save button first, then click on the Save button at the top left of the settings popup. Close the popup.
Now add another Trigger: Output (On/Off), open the settings popup, and name this one “Humidifier off = fans low”. Set the If State to “Off” and set the Duty Cycle to about 20% for the low “idle speed”
(Never try to set a fan PWM below 20% or the fan will most likely stall.)

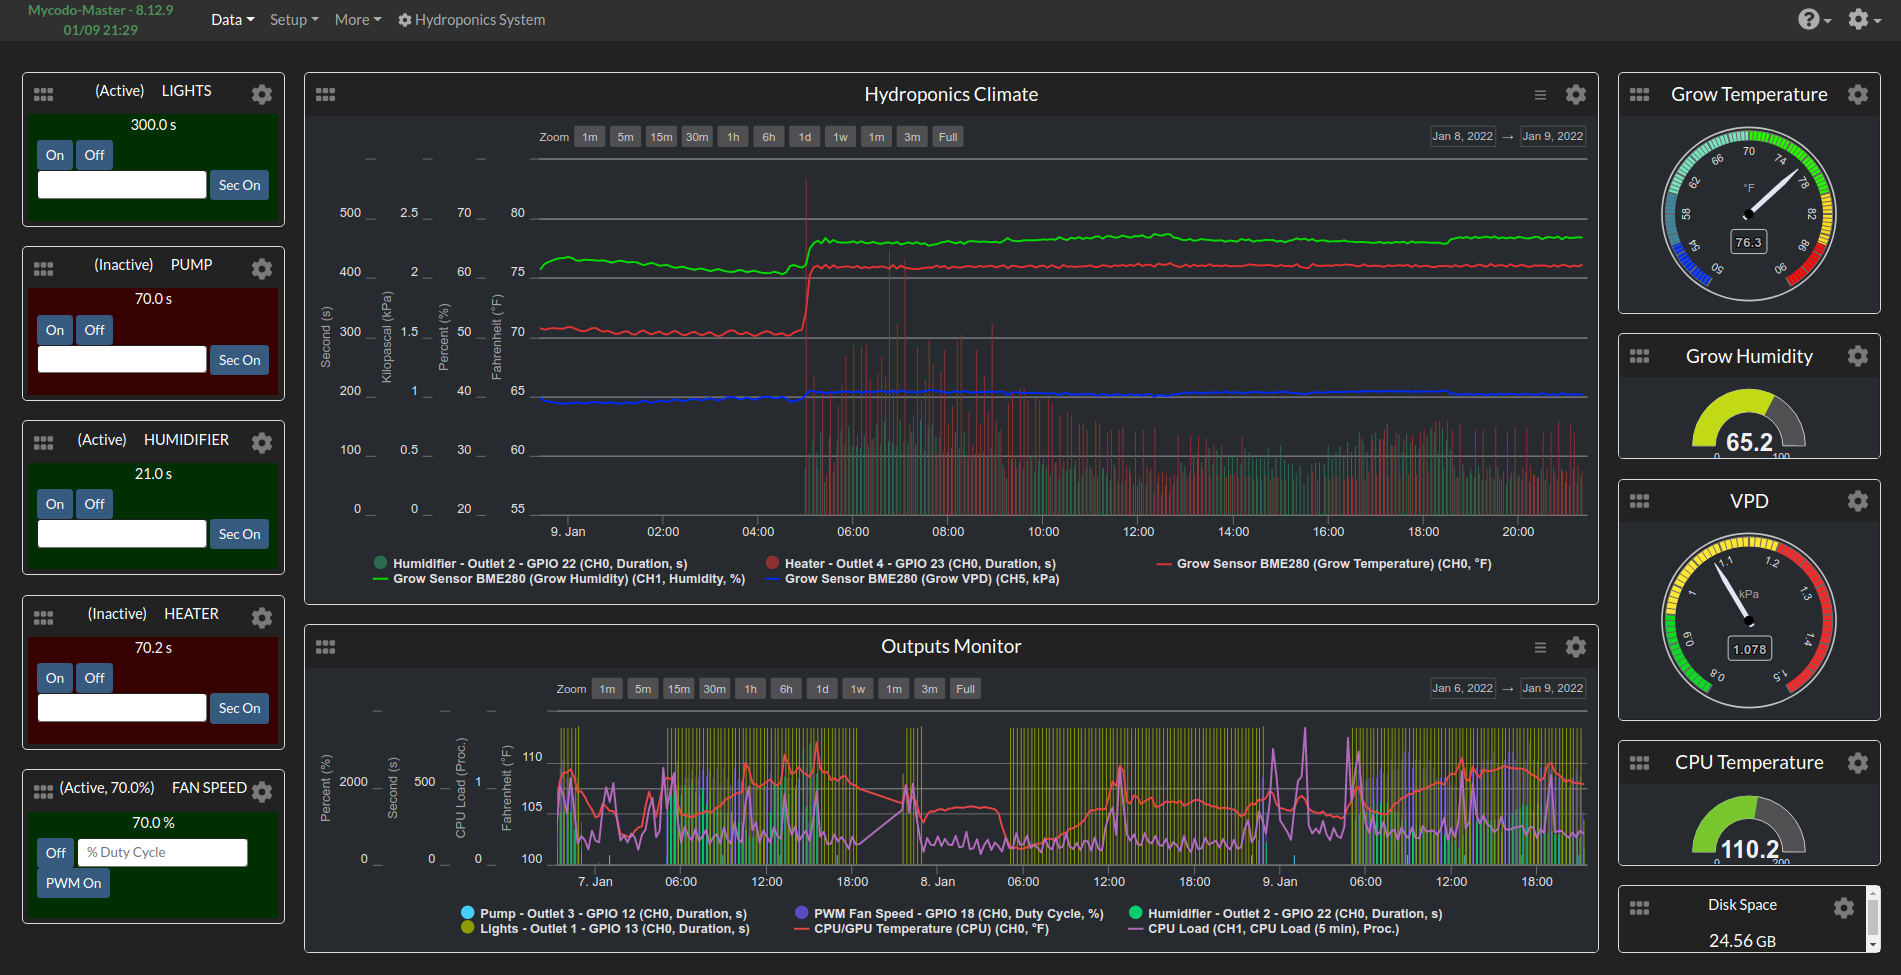
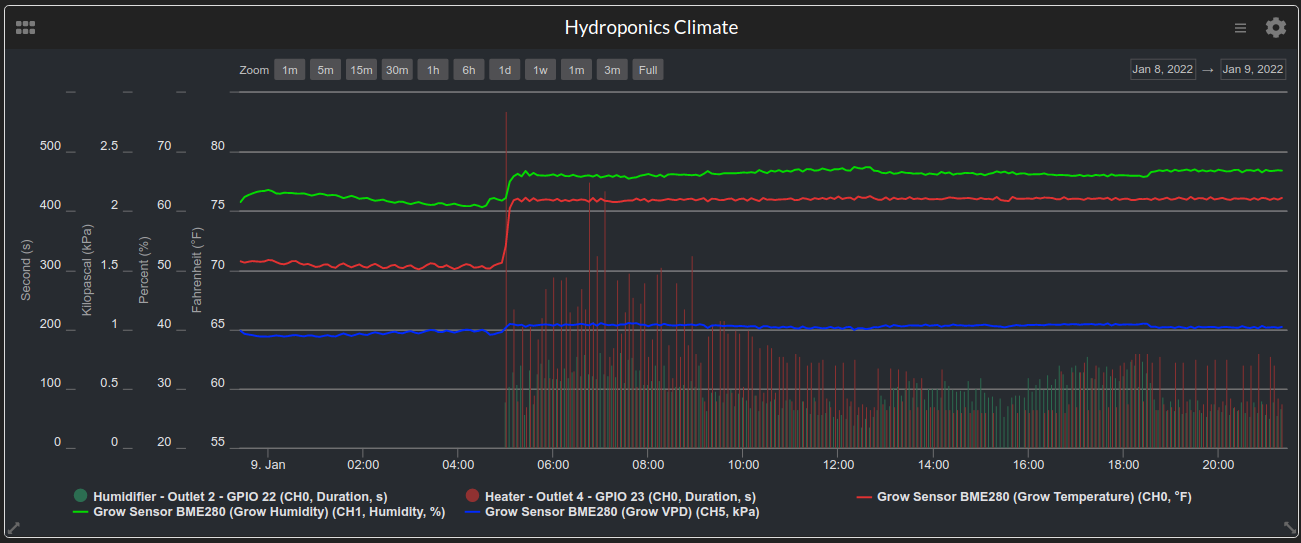
Now plug in all your outputs, fill your humidifier, close up your grow space, and activate the 2 Trigger: On/Off functions you just added first, then activate the Bang Bang Function. Monitor your dashboard gauges or graphs over the next few days and make adjustments to the fan speeds and set-points if needed. If your outputs are correctly sized, and your temps stay pretty constant, you should see nice flat levels on your VPD graph regardless of fluctuations in temp and humidity.
It should hopefully look something like this… (the blue line is VPD holding a 1.0 kPa regardless of temp/humidity)